
Proxmox HA-Cluster
Anwendungen
Eigenschaften
| pve1 | pve2 | pve3 | |
| Name | bad | team | work |
| IP-Adresse | 10.10.20.11 | 10.10.20.12 | 10.10.20.13 |
| Cloudflare-Tunnel | 10.10.20.14 | 10.10.20.15 | 10.10.20.16 |
| IP-Adress Vergabe | 10.10.20.21-64 | 10.10.20.65-128 |
10.10.20.129-196 |
| IPv6 für interne Kommunikation | fd69:beef:cafe::111/128 | fd69:beef:cafe::112/128 |
fd69:beef:cafe::113/128 |
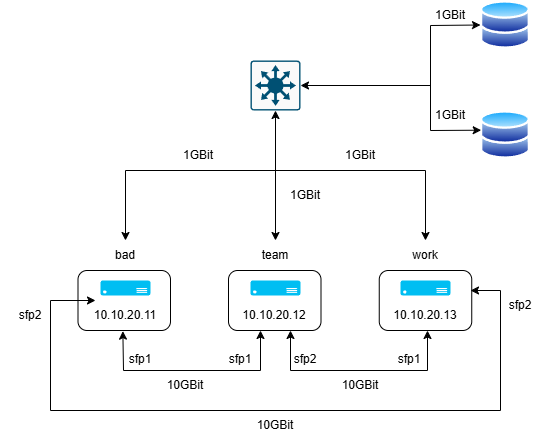
OSPF Konfiguration mit ffr
Mit dieser Konfiguration wird für die Kommunikation zwischen den Nodes immer die Route mit den geringsten Kosten ausgewählt. In unserem Fall die 10GBit Verbindungen. Fällt einer dieser aus, wird der der Traffik über eine weitere Node ausgewählt. Sollte diese ebenfalls ausfallen wird auf das normale 1GBit Netz zurückgergriffen. Es ist nicht erforderlich einen weiteren Switch einzubauen. Durch die eingebaut NICs ist die Konfiguration möglich.
Für jede Node wurde dabei eine IPv6-Adresse ausgewählt in unserem Fall:
- fd69:beef:cafe::111/128
- fd69:beef:cafe::112/128
- fd69:beef:cafe::113/128
Als OSPF Router-ID wurde Platzhaltermäßig die 0.1.1.1, 0.1.1.2 und 0.1.1.3 ausgewählt. Jede Node verfügt dabei über den virtuellen Anschluss vmbr0 und die zwei 10GBit NICs enp2s0f0np0 und enp2s0f1np1.
ffr Installation:
Die folgende Installationen müssen auf allen 3 Nodes einzeln ausgeführt werden. Für jede Node gibt es allerdings eigene Konfigurationen welche anschließend aufgelistet sind.
apt install frr -ynano /etc/frr/daemonsospf6d=yesnano /etc/frr/frr.confbad:
# Note:
# FRR's configuration shell, vtysh, dynamically edits the live, in-memory
# configuration while FRR is running. When instructed, vtysh will persist the
# live configuration to this file, overwriting its contents. If you want to
# avoid this, you can edit this file manually before starting FRR, or instruct
# vtysh to write configuration to a different file.
log syslog informational

#Enable IPv6 forwarding since we are using IPv6
ipv6 forwarding

#Add our router's private address on lo (loopback)
#This address is a single address (/128) out of the subnet (/64)
#of our 'cluster' network, of which routes to individial /128s are
#distributed using OSPF
!
interface lo
        ipv6 address fd69:beef:cafe::111/128
        ipv6 ospf6 area 0.0.0.0
        ipv6 ospf6 passive
#Backup links via primary gigabit link (vmbr0)
#Cost for 1G assumptions (100 gig reference / 1 gig = 100 cost)
!
interface vmbr0
        ipv6 ospf6 area 0.0.0.0
        ipv6 ospf6 network broadcast
        ipv6 ospf6 cost 100
#Two p2p links ens19 and ens20
#Since we are using IPv6 we do not need to assign
#addresses on these links, relying on link-local addresses
#Cost for 10G assumptions (100 gig reference / 10 gig = 10 cost)
#Feel free to edit your cost as appropriate
#You can tweak these cost values to change the traffic flow
!
interface enp2s0f0np0
        ipv6 ospf6 area 0.0.0.0
        ipv6 ospf6 network point-to-point
        ipv6 ospf6 cost 10
!
interface enp2s0f1np1
        ipv6 ospf6 area 0.0.0.0
        ipv6 ospf6 network point-to-point
        ipv6 ospf6 cost 10
#OSPF router settings (unique router ID required for each router)
!
router ospf6
        ospf6 router-id 0.1.1.1
        redistribute connected
        auto-cost reference-bandwidth 100000
team:
# Note:
# FRR's configuration shell, vtysh, dynamically edits the live, in-memory
# configuration while FRR is running. When instructed, vtysh will persist the
# live configuration to this file, overwriting its contents. If you want to
# avoid this, you can edit this file manually before starting FRR, or instruct
# vtysh to write configuration to a different file.
log syslog informational

#Enable IPv6 forwarding since we are using IPv6
ipv6 forwarding

#Add our router's private address on lo (loopback)
#This address is a single address (/128) out of the subnet (/64)
#of our 'cluster' network, of which routes to individial /128s are
#distributed using OSPF
!
interface lo
        ipv6 address fd69:beef:cafe::112/128
        ipv6 ospf6 area 0.0.0.0
        ipv6 ospf6 passive
#Backup links via primary gigabit link (vmbr0)
#Cost for 1G assumptions (100 gig reference / 1 gig = 100 cost)
!
interface vmbr0
        ipv6 ospf6 area 0.0.0.0
        ipv6 ospf6 network broadcast
        ipv6 ospf6 cost 100
#Two p2p links ens19 and ens20
#Since we are using IPv6 we do not need to assign
#addresses on these links, relying on link-local addresses
#Cost for 10G assumptions (100 gig reference / 10 gig = 10 cost)
#Feel free to edit your cost as appropriate
#You can tweak these cost values to change the traffic flow
!
interface enp2s0f0np0
        ipv6 ospf6 area 0.0.0.0
        ipv6 ospf6 network point-to-point
        ipv6 ospf6 cost 10
!
interface enp2s0f1np1
        ipv6 ospf6 area 0.0.0.0
        ipv6 ospf6 network point-to-point
        ipv6 ospf6 cost 10
#OSPF router settings (unique router ID required for each router)
!
router ospf6
        ospf6 router-id 0.1.1.2
        redistribute connected
        auto-cost reference-bandwidth 100000
work:
# Note:
# FRR's configuration shell, vtysh, dynamically edits the live, in-memory
# configuration while FRR is running. When instructed, vtysh will persist the
# live configuration to this file, overwriting its contents. If you want to
# avoid this, you can edit this file manually before starting FRR, or instruct
# vtysh to write configuration to a different file.
log syslog informational

#Enable IPv6 forwarding since we are using IPv6
ipv6 forwarding

#Add our router's private address on lo (loopback)
#This address is a single address (/128) out of the subnet (/64)
#of our 'cluster' network, of which routes to individial /128s are
#distributed using OSPF
!
interface lo
        ipv6 address fd69:beef:cafe::113/128
        ipv6 ospf6 area 0.0.0.0
        ipv6 ospf6 passive
#Backup links via primary gigabit link (vmbr0)
#Cost for 1G assumptions (100 gig reference / 1 gig = 100 cost)
!
interface vmbr0
        ipv6 ospf6 area 0.0.0.0
        ipv6 ospf6 network broadcast
        ipv6 ospf6 cost 100
#Two p2p links ens19 and ens20
#Since we are using IPv6 we do not need to assign
#addresses on these links, relying on link-local addresses
#Cost for 10G assumptions (100 gig reference / 10 gig = 10 cost)
#Feel free to edit your cost as appropriate
#You can tweak these cost values to change the traffic flow
!
interface enp2s0f0np0
        ipv6 ospf6 area 0.0.0.0
        ipv6 ospf6 network point-to-point
        ipv6 ospf6 cost 10
!
interface enp2s0f1np1
        ipv6 ospf6 area 0.0.0.0
        ipv6 ospf6 network point-to-point
        ipv6 ospf6 cost 10
#OSPF router settings (unique router ID required for each router)
!
router ospf6
        ospf6 router-id 0.1.1.3
        redistribute connected
        auto-cost reference-bandwidth 100000
Test connection with iperf3
Installation x 3:
apt install iperf3Nload:
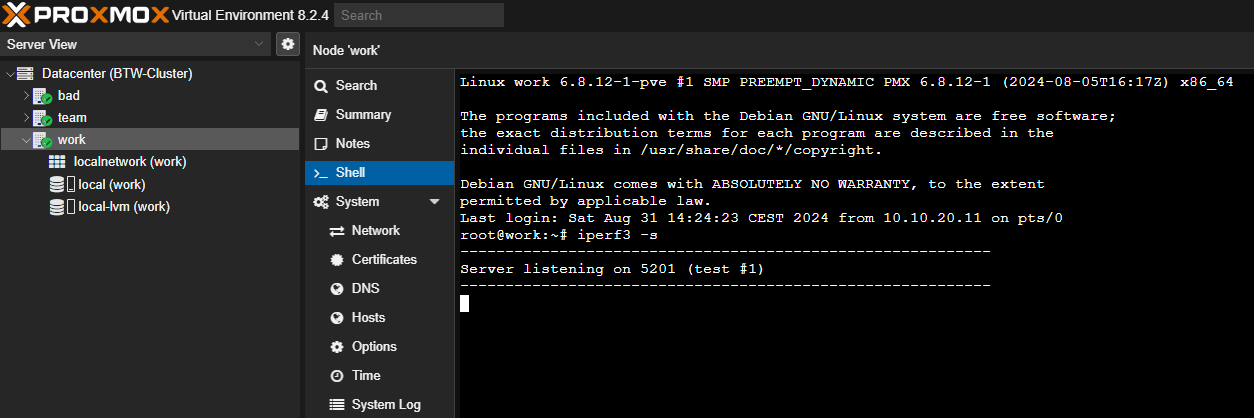
Für die Überprüfung werden im bestenfalls Beispielsweise zwei TABs in der dritten Node geöffnet. Auf einem TAB wird iperf3 gestartet auf dem anderen der nload Befehl ausgeführt um die einzelnen Anschlüsse während dem testen, zu überwachen. Iperf wird dabei mit folgenden Befehl gestartet:
iperf3 -sAnschließend ist der Server Port offen:
Für nload kann dann folgender Befehl eingegeben werden um nload zu installieren:
apt-get install nloadund schlussendlich folgender Befehl um nload auszuführen:
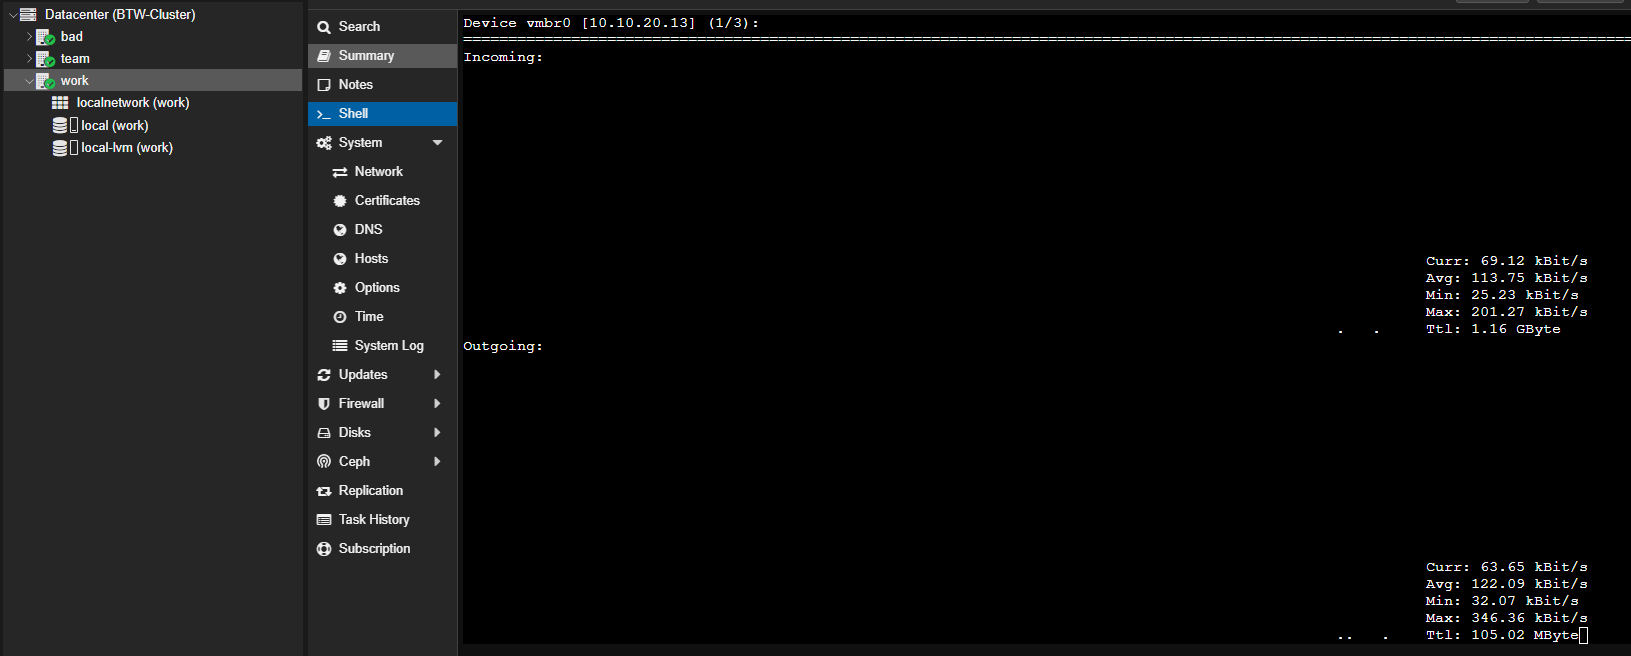
nload vmbr0 enp2s0f0np0 enp2s0f1np1Führt man den Befehl aus wird im Shell eine Anzeige geöffnet die den Live Traffic an den einzelnen Anschlüssen anzeigt. Mit den Pfeiltasten kann zwischen den Anschlüssen gewechselt werden.
Wenn man anschließend von einer anderen Node aus einen Test auf die IPv6-Adresse der Node durchführt, auf der der Server gestartet wurde, sollte der Traffic sowohl in der Shell der Node als auch in nload sichtbar sein. Die drei Nodes können dabei jeweils mit dem folgenden Befehl getestet werden:
iperf3 -c fd69:beef:cafe::111 -t 3000iperf3 -c fd69:beef:cafe::112 -t 3000iperf3 -c fd69:beef:cafe::113 -t 3000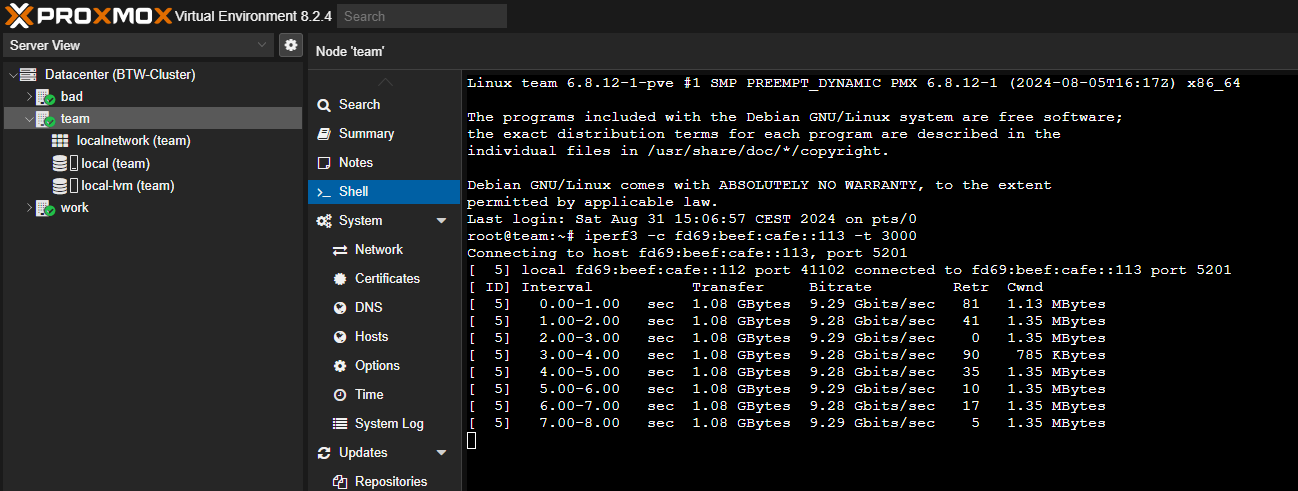
Deinstallationsbefehle
iperf3:
apt-get remove nloadnload:
apt-get remove iperf3